
Waterproof Outdoor LED Sign Lighting: Mounting
A wet sign fails because water cannot leave, not because it got in. How mounting attitude sets drainage, where the outlet belongs, and what IP codes miss.
A sign that fails wet almost never fails because water got in. It fails because water got in and then had nowhere to go. Once you accept that, most waterproof outdoor LED sign lighting specs read backwards: they open with an IP number and close with a sealant brand, when both of those are the last decisions in the sequence, not the first.
Search the phrase outdoor LED sign lighting waterproof and you get a wall of signs to buy. Search the problem behind it — where does the water leave — and you get nothing useful, because the answer is in the geometry of the letter and not in the label on the module.
The first decision is where the sign hangs and which way it faces. Orientation decides the water path. The water path decides where the outlet has to be. The outlet position decides where the strip and its terminations can sit. Get that order right and an IP65 module in a well-drained letter outlasts an IP68 module in a letter that holds two litres of rainwater under it. Get it wrong and the rating is a number on a carton.
Outdoor sign lighting is normally specified around a light level, a colour and a look. Nobody signs off the drainage, which is why the drainage is what fails.
This is written from the manufacturing side: we build sealed and addressable strip in Shenzhen and ship it into signage, and the returns we see are rarely failed modules. They are letters with standing water in them.
Water does not get into a sign; it gets stuck in one
Three things are worth internalising before any product choice, because each one contradicts what a datasheet implies.
An IP68 module in a pond is a wet module. The rating describes the enclosure that was tested at the factory, not the cavity it is installed into. A module rated for immersion survives being immersed; it does not make the thing around it watertight, and it does not dry the space it sits in.
A fully sealed letter is wetter than one with a hole in it. A channel letter is a shallow tray with a lid bonded on three sides. Sealed on all four, it becomes a still, warm, humid box that breathes through every imperfect bond line and condenses on the first cold night. Given one exit at the bottom, the same box stays dry on the inside, because the moisture leaves as fast as it arrives. Sealed and undrained, it is not a waterproof enclosure — it is a terrarium.
The lowest point of a letter on the bench is not the lowest point of that letter on the wall. Hang a 900 mm letter on a fascia with a 3° fall and the low corner moves — often by 30 mm or more. Every drain drilled before hanging is drilled in the wrong place if the substrate is not level, and sloped fascias are the normal case, not the exception.
Put those together and the working rule is a balance, not a barrier:
A sign stays dry when the exit is better than the entry. Sealing controls the entry rate. Orientation and drainage control the exit rate. You need both, and only one of them can be fixed on site after the sign is fabricated.
That is the whole argument. The rest of this article is the exit rate: what the rating does and does not promise, what vertical mounting changes, where water actually arrives, and how to make the outlet the true low point of the assembly as it hangs.
If you are still choosing the product rather than installing it, the sign and channel letter selection guide covers that decision. Everything below assumes the choice is made and asks the question nobody signs off: where does the water leave.
What IP codes promise outdoor LED sign lighting waterproofing — and the four things they do not
The code comes from IEC 60529, and the second digit is the water test. The IEC's own explainer is blunt about why the standard exists: to give buyers something more specific than marketing words like "waterproof". The test conditions behind each digit are where a sign spec usually goes wrong.
Code | Test condition | What it reads as on a sign |
|---|---|---|
IPX5 | 6.3 mm nozzle, 12.5 L/min, 30 kPa at 3 m, 3 min | Rain driven hard at a face under wind |
IPX6 | 12.5 mm nozzle, 100 L/min, 100 kPa at 3 m, 3 min | A powerful water jet aimed at the enclosure |
IPX7 | Immersion 1 m, 30 min, lowest point 1,000 mm below the surface | A letter standing in flood water for half an hour |
IPX8 | Continuous immersion, depth and duration specified by the manufacturer | Almost never relevant to a wall-mounted sign |
Note what IPX8 is not. It is not "1 m for 30 minutes" — that is the IPX7 test, and the two get conflated often enough that a specification is better off quoting the test than the number. IPX8 is continuous immersion, with the depth and duration specified by the manufacturer, generally up to 3 m. A datasheet that prints "1 m / 30 min" beside an IP68 claim is telling you which test it actually passed.
On the products themselves you will see IP65 and IP66 rather than IPX5 and IPX6. Each adds the dust digit to the corresponding water test, so IP65 is IPX5 plus dust-tight and IP66 is IPX6 plus dust-tight. For a sign, the second digit is the one that decides whether the assembly survives; the first is a dirt and insect question, which is maintenance rather than survival.
The four things the number does not cover:
It describes an assembly, not a component. The tested object is the sealed product that left the factory. Fit an IP68 module into a letter whose face seam leaks, and the assembly is wet regardless of the label. The same physical board is sold across IP20 to IP68 precisely because the protection layer changes and each variant carries its own result.
It is tested in fresh water. Salt, chlorine, pool chemistry, oils and solvents are outside the rating. A coastal storefront or a poolside sign is a different corrosion problem, not a higher grade of the same problem.
It says nothing about freezing. Water expands by roughly a tenth when it turns to ice. A drain that is adequate in July can be blocked by an ice plug in January, and the same expansion that opens a seam does it silently, from the inside.
It does not describe direction or duration in service. IPX5 and IPX6 are jets from any direction for three minutes. A sign that faces a maintenance crew with a pressure washer twice a year, or a prevailing wind that drives rain at 45° into a drain hood for six hours, is outside both tests. Water ratings are also not cumulative beyond IPX6 — a product that passes immersion is not automatically compliant with the jet tests, because a submerged seal and a jet-loaded seal fail differently.
If you are still choosing a grade rather than draining one you own, the IP65 vs IP67 comparison and the IP67 vs IP68 comparison cover the two decisions that come up on signage, and the outdoor IP selection guide covers the environment side. What none of them can do is fix a letter that has no low point.
What vertical mounting fixes — and the three problems it creates
Vertical mounting is the right default for outdoor letters, and for a physical reason rather than a stylistic one. A vertical surface sheds. Water arrives as a film or a splash, runs down under gravity, and leaves — provided there is somewhere to leave from. There is no upward-facing ledge to hold a puddle, and no horizontal lens for dirt and water to sit on.
The alternative, a strip or module lying face-up on the floor of a return or on a raceway lid, is a tray. It holds water until the water finds the bond line.
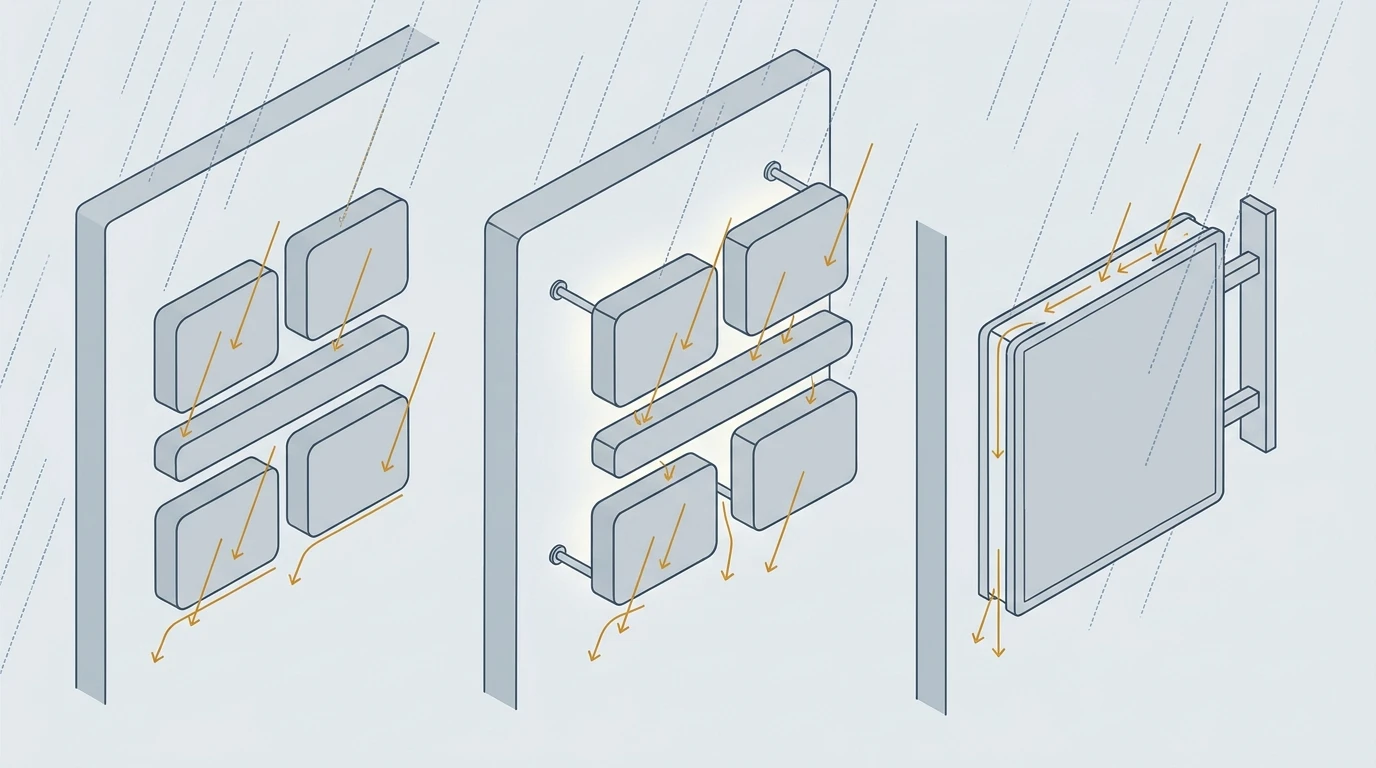
But vertical orientation is not a free win. It converts three problems from "unlikely" into "structural".
The low end of the run becomes a termination. In a tall letter — 900 mm is common, 1,500 mm happens — a vertical strip run ends somewhere, and if it ends at the bottom, the end cap or the connector sits at the one point where every drop of water on that strip arrives. A termination is a bond line, and a bond line is the weakest element in any sealed assembly. Terminations belong at the top whenever the wiring allows it, and when it does not, they belong inside a factory mould rather than under a cartridge gun.
Gravity feeds the cable, not just the surface. Water running down a vertical face reaches the cable, follows the jacket, and arrives at the gland or the knockout from above — the direction no gland is designed for. This is why a cable entry that is perfectly sealed can still fill a letter: the seal holds, the water walks past it on the outside of the jacket, and enters at the point where the jacket ends.
Condensation lands on the lowest module. In a vertical letter the coldest surface at night is usually the face, and the face is directly above the lowest row of LEDs. Whatever condenses on the inside of that face runs down it and drips onto the module with the least clearance to the floor of the return. Vertical orientation makes the drainage question sharper, but it also aims the condensate at a specific place.
None of that argues for horizontal mounting. It argues for treating the bottom 100 mm of a letter as the part that decides whether the whole assembly survives.
The four paths water takes into a vertical letter
Leak callbacks concentrate in four places, and each has a different fix. Sealing all four with the same tube of silicone fixes none of them properly.
The face-to-return joint and its trim cap. This is a capillary path, not a pressure path. A gap of a fraction of a millimetre is enough once surface tension is doing the work, and the trim cap hides the joint from inspection. A gasket only helps where it is actually compressed — a foam strip that fills the gap without load is a spacer, and water travels along its own edge — and rimless letters, where the face is bonded straight to the return with no cap, remove the hiding place and concentrate the whole load on one adhesive line.
Fasteners and standoff penetrations. Every screw through the back panel is a hole with two interfaces to seal — sign to washer, washer to wall — and most installs seal one. On halo-lit letters with standoffs, the fastener also carries the load, so the seal is under continuous movement.
The cable entry. The single most common real leak in the field is not the sign at all: it is the knockout. A hole punched one size too large, a grommet skipped, tape wrapped over the gap. Tape is a schedule, not a seal. Enter through the back panel rather than the floor of the return, as high as the wiring run allows, with the cable leaving downward and a drip loop below the entry.
The bottom of the return itself. Welds, hemmed seams, the drain, and the point where the aluminium return meets the back panel all sit in the wettest part of the assembly. A drain drilled without a hood admits wind-driven rain by the same hole it was meant to drain through.
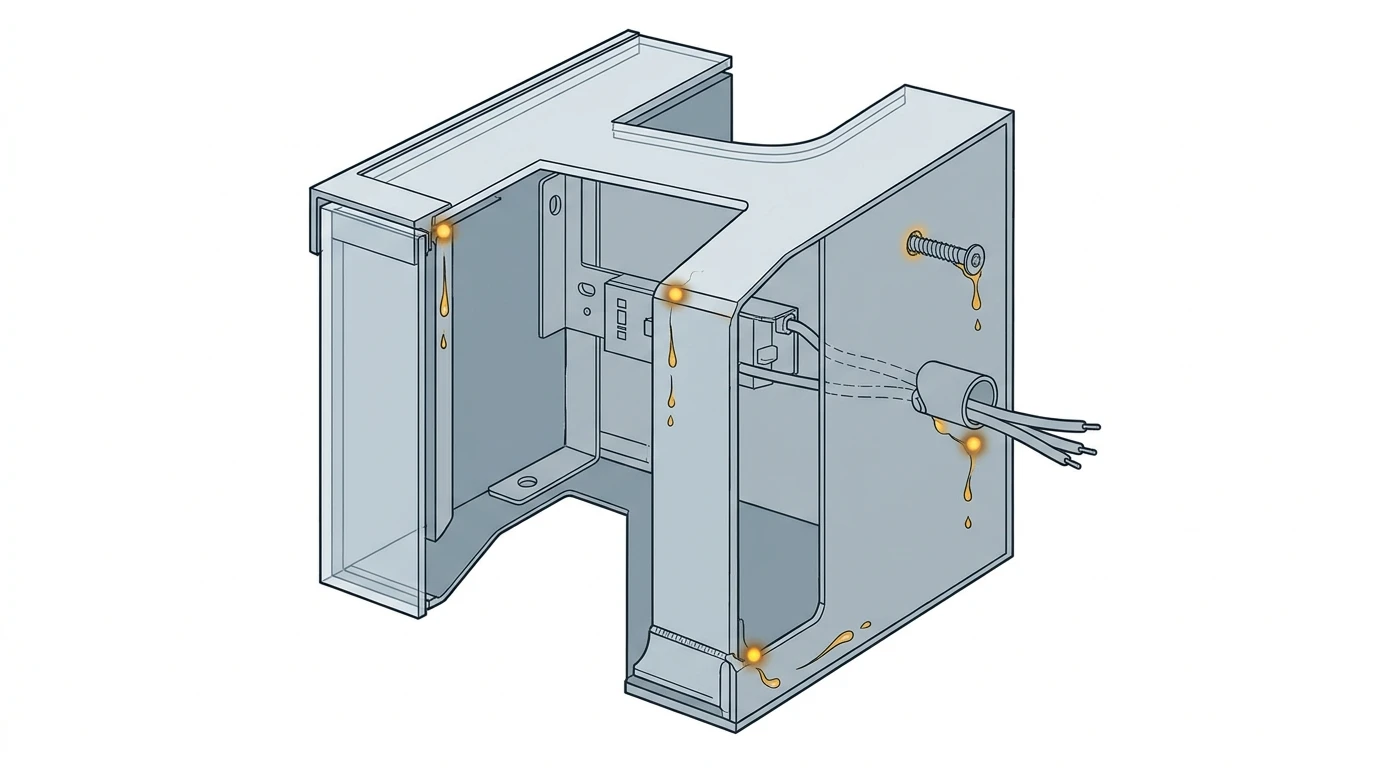
Where two strip lengths have to meet inside a letter, the joint itself is a fifth path, and it has its own craft: sealing a cut end so the IP rating survives is a different skill from draining a cavity, and both are needed. The distinction that matters for a specifier is that a factory termination is part of a tested assembly and a field joint is not, no matter how carefully it is made.
Making the outlet the lowest point — as installed
Everything in this section is one instruction in four parts: put the exit where the water actually collects, protect it, keep it clear of the electrics, and give the cavity more than one.
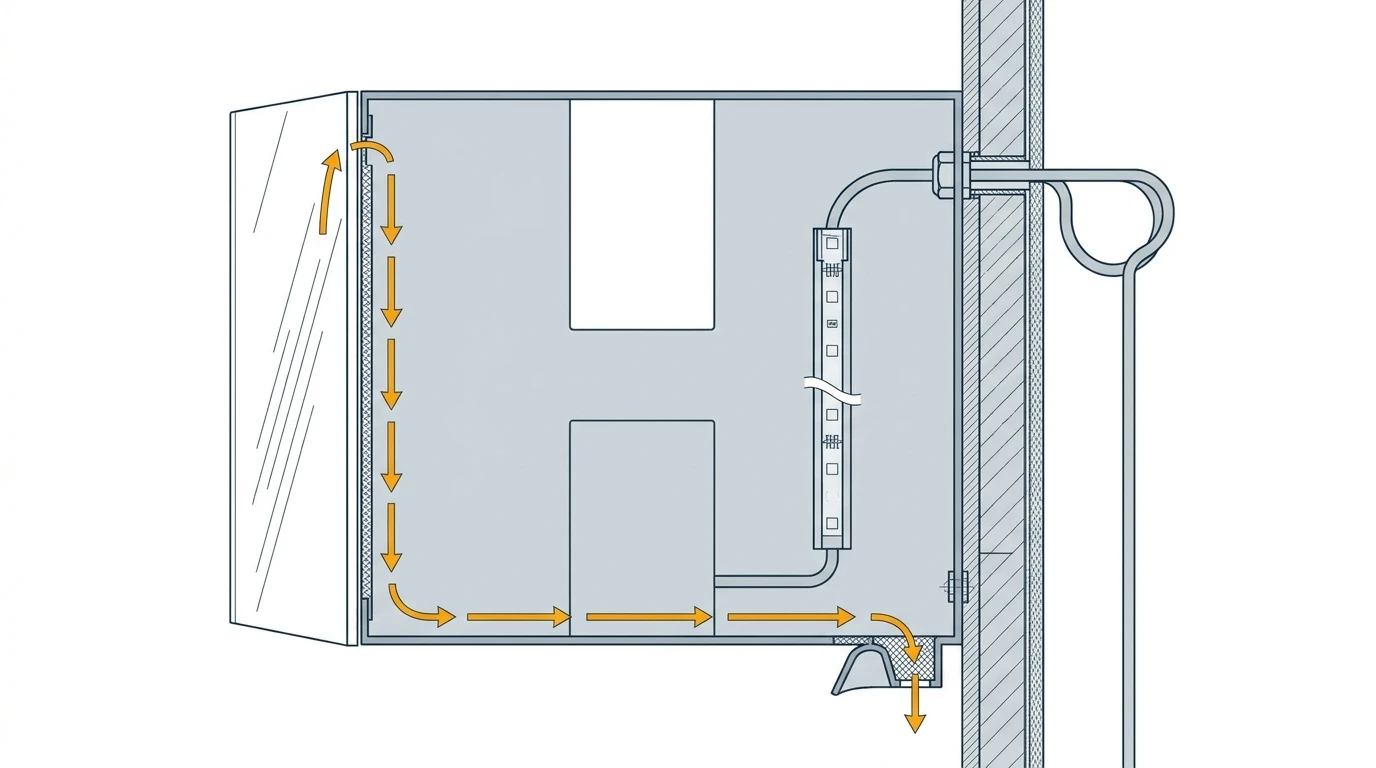
Put the drain at the true low point, which means after hanging. A drain — a weep hole, in sign-shop usage — drilled on the bench is a guess. Drill and mark on the wall, or dry-hang first. On a letter with a fall in the substrate, the low corner is not where the bench told you it was. The cheapest version of this check is a spirit level on the return as it will hang, plus a litre of water poured in to see where it goes — five minutes that replaces a callback.
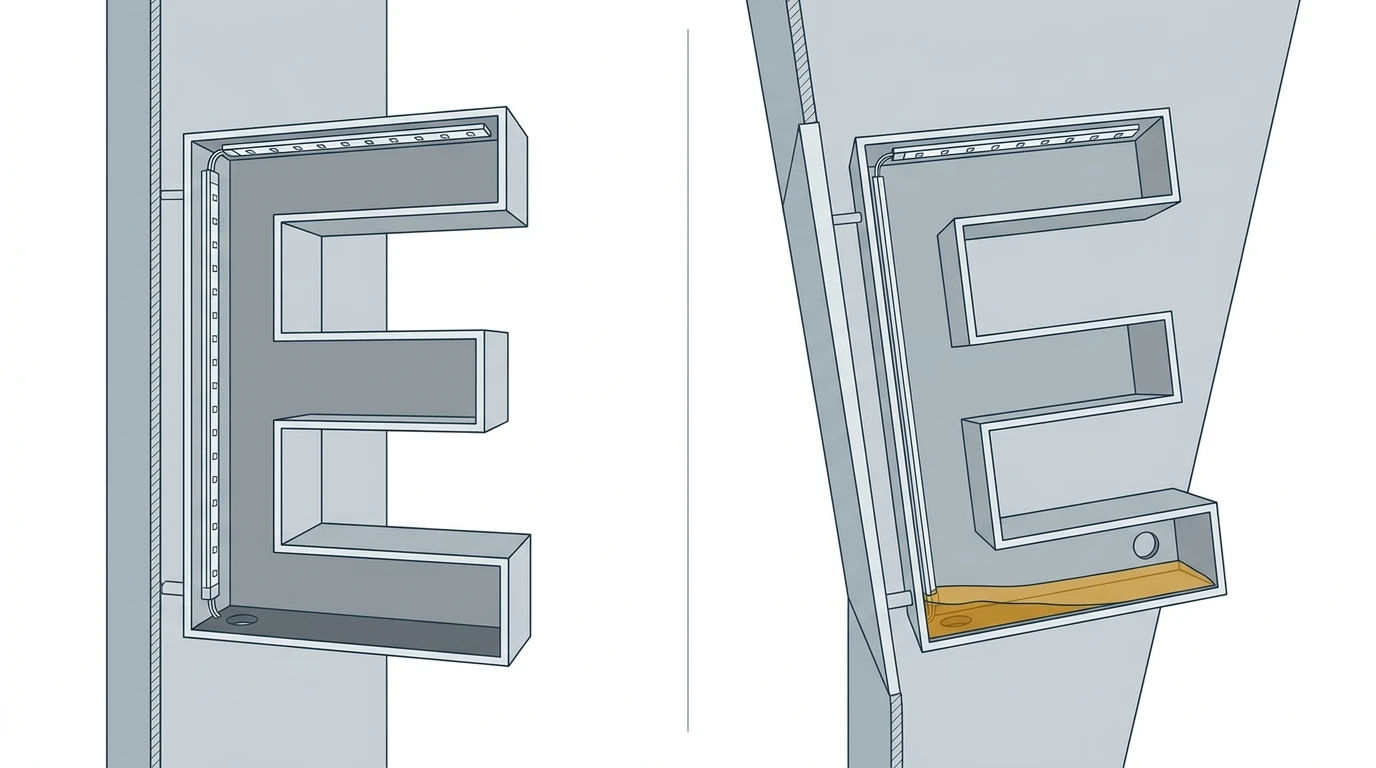
Hood it and screen it. A hooded or recessed drain admits water downward and refuses it upward; an open hole at the bottom of a return is an intake in a crosswind. A stainless mesh screen over the opening keeps insects and debris out — an unscreened drain is a drain that will be blocked within a season, which is the same as having no drain.
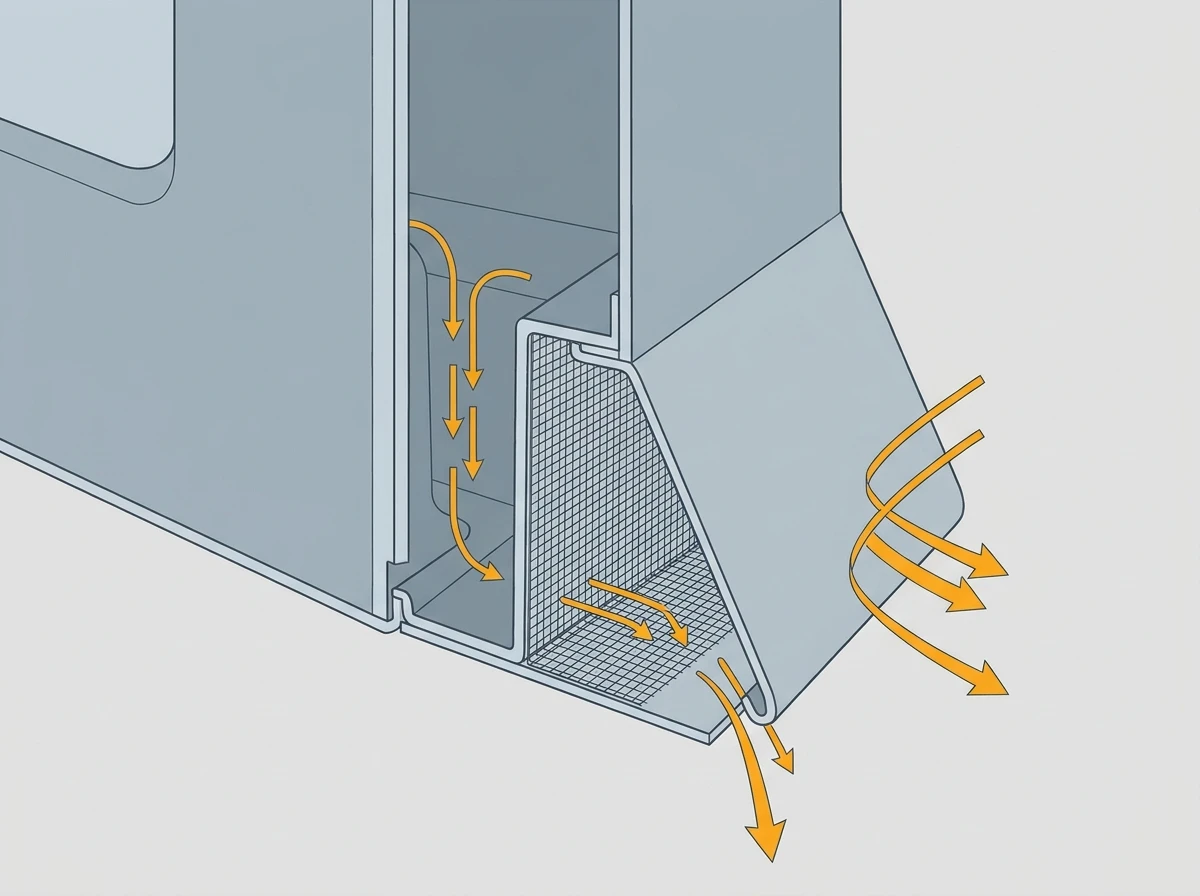
Keep the drain path clear of the LEDs. Water has to travel from where it lands to where it leaves. If the strip lies on the floor of the return, or crosses the only route to the drain, the water stops at the strip and the strip is the thing that gets wet. Mount clear of the floor, and never across the drain.
Give the cavity at least two exits. One drain is a single point of failure: it clogs, or it sits slightly above the true low point after the sign settles, and the cavity holds water with no second chance. Two drains at the low end cost nothing at fabrication time.
Two structural notes that follow from the same logic. Dual-lit letters have two cavities — the face seam and the back seam — and each needs its own drainage or the rear one fills. Raceway-mounted letters add a third cavity, the raceway itself: drain it separately, and do not let the letters drain into it.
Field rule: if you cannot say where the water leaves this letter, you have not finished designing it — you have only finished sealing it.
Condensation is the load nobody specifies for
The number of letters that leak from rain is smaller than the number that leak from the air inside them. The mechanism is worth understanding because the fix is counter-intuitive.
On a clear night, an acrylic face radiates heat to the sky and drops below the ambient air temperature — several degrees, routinely. The air inside the letter is warmer and carries moisture from the day's humidity and from the substrate. The inner surface of the face is now below the dew point of that air, so vapour condenses there. It does not condense in the middle of the cavity or on the back panel; it forms on the coldest surface, which is the face.
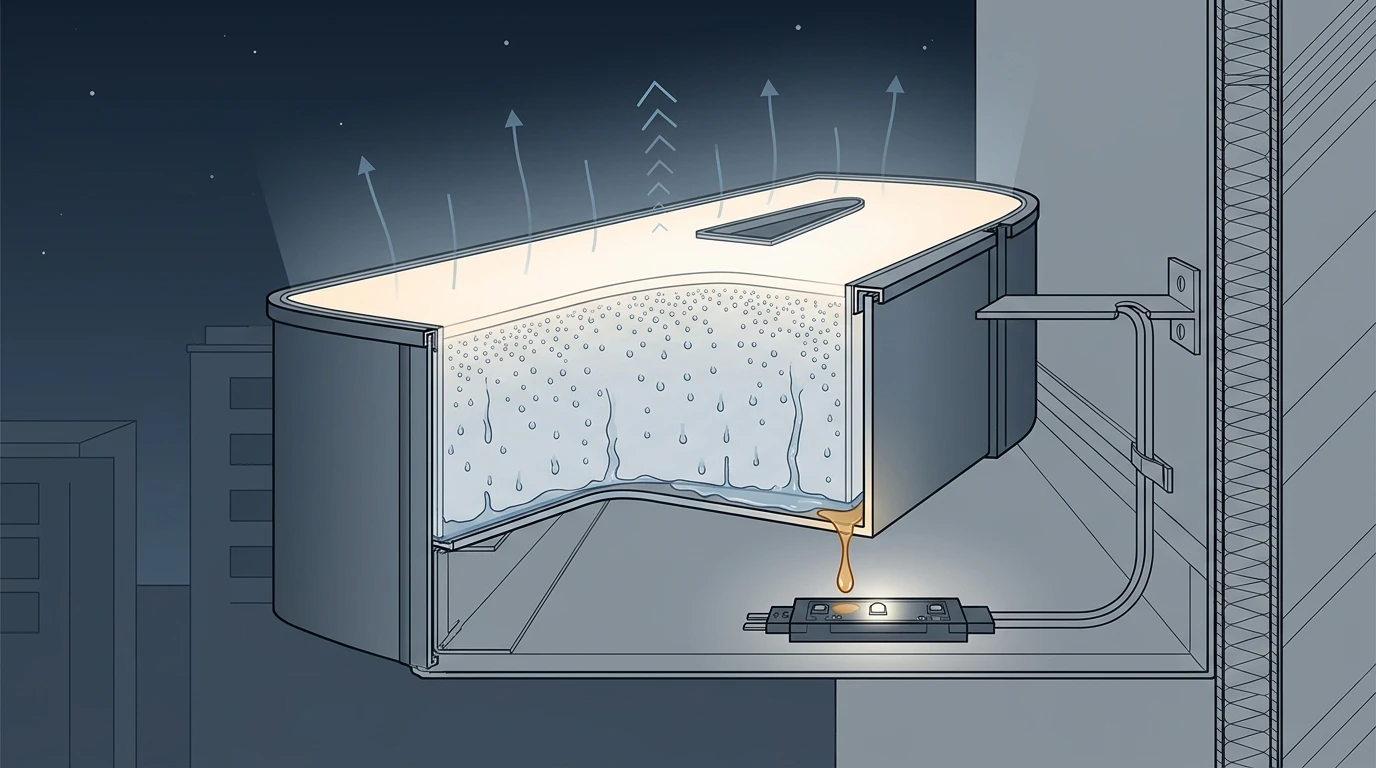
Then gravity takes over. Droplets on the inside of a near-vertical face grow, merge, and run down to the lowest edge of that face — which sits directly above the lowest run of LEDs. A letter can be perfectly sealed against rain and still deliver a steady drip onto its own bottom module every night of a humid spring.
The daily cycle makes it worse. Air expands as the letter warms and contracts as it cools, so the cavity breathes through every imperfect bond line in both directions, and each inhale brings in more moisture to condense on the next cold night.
Three responses follow, in order of effect:
Reduce the air volume. Filling the void — with encapsulant in a termination, with a filled sleeve bore, with a module body that occupies its own space — leaves less air to hold vapour and less surface for it to condense on. This is the factory-side answer, and it is the one that cannot be retrofitted.
Equalise the pressure without admitting water. A breathable membrane vent equalises pressure slowly and passes vapour while refusing liquid, which turns the daily breathing cycle from a water pump into a pressure relief. Site the vent high, opposite the drain, where it is sheltered from driven rain.
Drain the low point anyway. Condensate that does form has to leave. This is the same drain as before, doing a second job.
A desiccant pack is a diagnostic, not a solution. If one saturates within a season, the enclosure is exchanging air faster than you assumed — that is useful information about the build, not a consumable to reorder every year.
The install sequence for a vertical run
The order matters more than the individual steps, because three of them are impossible after the letter is on the wall.
- Hang or dry-fit before drilling anything. Confirm the low corner as it will sit in service, on the actual substrate.
- Set the fall inside the return — a degree or two toward the intended drain point, on the floor of the return rather than the face. Water has to be given a direction, not just a destination.
- Drill the drain or drains at the true low point, hood the opening, fit the screen.
- Mount the strip clear of the return floor, with no part of the run crossing the drain route.
- Terminate at the high end where the wiring allows: factory-moulded end, or a capped and filled sleeve end. If the cable must arrive from below, bring it through the back panel above the standing-water line rather than through the floor of the return.
- Seal the top and the sides, leave the bottom open. A continuous bead along the top edge and down both sides, stopping short of the bottom corners, so the cavity can vent at the low end. Sealing the bottom closes the exit you just built.
- Vent high, drain low, on opposite faces. The pair is what makes the cavity breathe in a controlled direction instead of wherever the wind pushes.
- Test the assembly, not the module. Hose the trim cap and the drain area for a few minutes, then check insulation resistance before and after. What you are looking for is a change, not an absolute number.
Step 8 is the one that gets skipped, and it is the only step that produces evidence. A water test performed on the finished, hung letter is the difference between a specification and a hope.
Where vertical mounting is the wrong answer — and what to specify instead
Vertical orientation solves the wall-mounted letter. It does not solve every outdoor sign, and treating it as a universal rule produces its own failures.
Ground-level monument and pylon signs. At 300 mm above grade, a vertical letter is in the splash zone. The correct move is mounting height and a drained plinth, not a better module — no rating protects against standing water that arrives from below.
Letters shallower than about 60 mm. A lensed strip needs clearance in front of the LEDs and room behind for the cable; a shallow return has neither. The honest options are side-emitting neon flex in the return, or single LED modules for channel letters fixed to the back panel, rather than forcing a strip into a cavity it does not fit and then sealing the gap with silicone.
Anything under a ledge, canopy or roof edge. Runoff from the building above lands on the top of the sign, and no amount of sealing on the letter will stop it. The fix is a drip edge or flashing above the letters, fabricated in metal.
Coastal and poolside sites. Fresh-water ratings are the wrong currency here. The failure mode shifts from "water got in" to "chloride got in and stayed", which is a materials and maintenance question — 316 stainless fasteners, and a re-inspection interval measured in months rather than years.
Where a project does need sealed strip inside a letter — the common case for a run that has to be cut to length and still arrive terminated — the specification to ask for is a series offered across protection levels rather than a single rating, such as our sleeve-waterproof pixel strip, which the catalogue lists from IP20 through IP68. For shallow letters, the side-bend neon flex is usually the better fit, since the bending plane and the cross-section do the work that depth would otherwise have to do.
Five clauses do more for an outdoor sign than any note about IP grade:
- Orientation: "All illuminated letters mounted vertically, with the strip set clear of the return floor and no run crossing a drain path."
- Drainage: "Minimum two hooded, screened drains per cavity, at the low point measured after hanging. Drain paths confirmed on site before the face is closed."
- Terminations: "Factory-terminated lengths; no field joints in any cavity below the water line. Cable entries through the back panel, above the standing-water line, with a drip loop."
- Sealing: "Neutral-cure, electronics-grade silicone on top and side seams only. The bottom edge is left open to vent and drain."
- Verification: "Water test on the hung assembly at the trim cap and drain, with insulation resistance recorded before and after."
None of that is exotic. It is the difference between a sign whose water has somewhere to go and a sign whose water has an IP rating.
If you are working through the geometry on a specific project — letter depth, mounting height, where the wiring enters — send the details and we will tell you which arrangement fits, and which terminations can be moulded before the run leaves the factory.
Specifying pixel LED for a real project?
Send the spec — pitch, IC, IP class, run length, voltage — and you get an engineer's answer, not a catalogue. Samples and OEM/ODM quotes from the Shenzhen factory floor.